Weathering detail: Moelwyn…
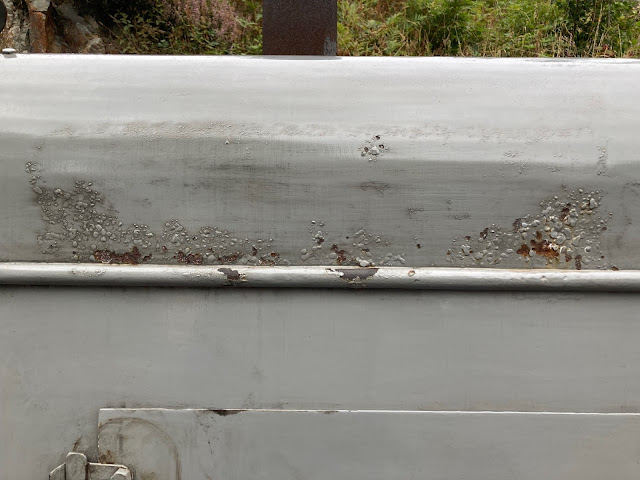
‘Gosh the paintwork is a bit rough there’ I thought as I glanced along the Ffestiniog Railway’s WW1 Baldwin diesel mechanical, before it dawned on me, that was where it carried its name plate in the past, Moelwyn…
 Recognising this damage and defect I’m the paint my eyes wandered over the rest of this peculiar but characterful locomotive, and I took a few photos to both remind me and to share a discussion on how these may be recreated in miniature.

This bubbling, rust amd old paint under the paint might tempt you into applying texture to your model, but in my experience this doesn’t work in the smaller scales. I’d represent this with micro painting alone, using a darker grey with the odd spot of a dark rust shade.
 The yellow labels amd blue oil can above the front stabiliser caught my eye… to represent these in miniature I’d choose a lemon colour and a less vibrant blue, as colours like these need scaling down too…
 Despite appearing on first glance quite clean there is a massive variation in colour tone in the bodywork and chassis. Look at the freshly applied lubrications on the painted rods, and the ring of orangey residue on the crank pin. The chassis is covered in a brown dirt but it’s not Matt or dry, it’s oily and greasy looking, this is often not well represented in our models, I’d be using gloss paints I’m the weathering mix, perhaps replacing the Humbrol 245 (which is a matt grey blue) with a home brewed gloss black and blue mix, increasing the sheen in this area.
 On the body a pin wash / panel line wash in a dark grey with a touch of brown (this is a wash applied only very carefully to the edges of doors and grills, cleaning off any on the flat surfaces before it dries) would form the basis… careful micro painting of damage from the door catches, rusty bits or just grease on the hinges… and a quick mist with the airbrush with a brown mix to soften the edges.
 As on Lyd, the roof seems pretty clean, but the bodywork and buffer beam show a collection of dirt. The cab interior would need plenty of dry brushing with gun metal to represent worn surfaces. One final shot is the front stabiliser, which shows the difference the shape of the bodywork makes to the weathering. Note the angle iron either side of the axle box is quite brown, whereas the spring bracket is a lot blacker… and despite it neons a dry day, none of this is matt, it’s all got a soft oily sheen.
 Careful observation of our prototype is the only way to achieve realism. That’s observation of colour, texture and shape… as important is understanding where the weathering has come from, how it was formed because this can help ‘fill in the gaps’ when we perhaps don’t have quite enough reference material for our chosen prototype. I hope these posts have started to encourage you to breathe life into your own models, but if you’re not confident in applying this weathering finish than I’d be happy to help, get in touch for a personal proposal via email on Facebook the contact form or a forum message. Until next time, more soon…


Comments
Post a Comment
Thank you for leaving a comment on my blog - I appreciate you taking the time to share your views. If you struggle to log in, please turn off the ‘block cross-site tracking’ setting in your browser.
James.