Bear Creek: Greening up and adding texture…
The first weekend after the first week back in school / work is always one for lots of rest! Everyone is worn out, with early mornings and getting back into the routine. I often find this time of year can be a great time to work on a more creative task, perhaps with a little learning thrown in...


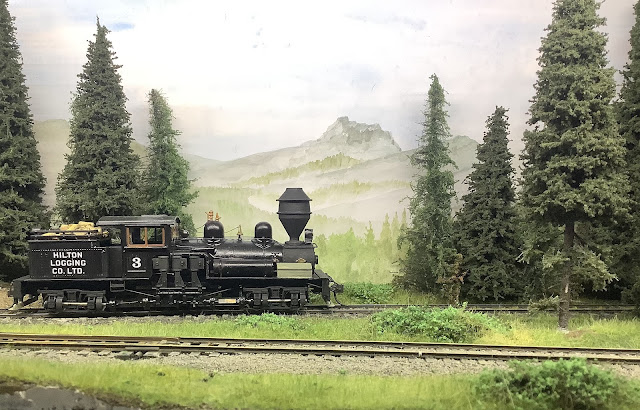 |
| The old Shay on the logging spur's days are numbered as trucks have already closed a number of the line's railroad camps, bringing lumber down to new 'reloads' located along the main. |
I began work on Bear Creek before Christmas, and this cameo shelf scene had track laid, back scene painted and trees 'planted' before the holidays. However, I've been procrastinating on how to take the layout forwards, wondering how best to represent the colours, textures and mix of green lush vegetation and the debris of a logging railroad.
After studying pictures in the Gary Durr 'Morning Sun' book on the Pacific North West logging lines (in Washington), specifically looking at the track and line side vegetation. It dawned on me that the first steps would be no different in method that I had worked before, but with a focus on layering and colours. I had previously glued real earth down as a foundation across the whole landscape, to this I applied Peco basing glue by stiff brush, not aiming for 100% coverage, and began mixing Peco-scene 1 and 2mm fibres in my small 'Precision' applicator (also from Peco). The 1mm autumn and 2mm winter fibres varied in colour, but are very green so added a verdant undergrowth layer. It was great to see this come to life, and later I added some Mini-nature 4.5mm 'fall' fibres to fill in the gaps in places.
The same 1 and 2mm fibres were used around the track work, to see if these matched the look of the pictures, more will be added in time - but generally this was beginning to look promising, and it encouraged me forwards. I laid in some Mini-nature 'weeds with leaves' to add some variety in the undergrowth but I felt these perhaps were a little coarse so most of this was covered later. I also added some teased out dark green Woodland Scenics 'foliage', to act as a base for some shrubbery. By using a matt lacquer spray (in this case Rustoleum's 'Clear') I could work quickly, adding some ground foam 'leaves' and then spraying, adding a layer of chopped up 'postiche' (fake hair), spraying, repeating. It is also possible to add some further depth by using longer static fibres in the applicator, I used 6mm here before repeating the cycle. This has begun to add some variation as seen in the top photo below, but I also was keen to suggest this was a logging line and try out some new ideas...
I decided to rip open a tea bag and see if the contents could be used for 'bark' and 'debris' along the right of way but I was a little heavy handed and along the 'main' in particular this was just too stark a contrast. Lesson learnt, I removed a little and then blended it back in with some 'earth blend' Woodland Scenics flock whilst the glue was still dry. I also rubbed a little of this into the longer grass between the shrubs, subtly altering the temperature of the scene and reducing a touch of the vibrancy.
The result, as seen below blends well with the back scene and will be further detailed in time. I need to touch in the white styrene 'filler' in the rail (where a cut for an isolation gap is) and add some blending to the exposed trunk/ground interface. I'd also like to model a tree stump or two, and I've some ideas for general rail-side clutter, old ties, rails etc, left over from when the main was relaid. The top photo with the Shay, was pre-tea, so this final photo shows the layout, as it will be viewed, at the end of the weekend. I have focused on this end of the layout to get 'my eye in' on techniques in a smaller area. Once happy I will work to the left... I'm also very aware that I promised myself a water tank structure, so need to consider the best way to scratch build that shortly! In the meantime, I've put all the scenic materials away for the week, as they clutter up the workshop when I'm doing commissions. I hope you all had a good weekend, thank you for reading, I hope the progress on Bear Creek encourages you to work on your own projects. Until next time more soon...
I spent a few minutes just staring at the last photo of the finished scene ... along with the stunning scenery treatment, two other aspects really stood out for me ... two things that show how the smallest of choices can make such a different, once the final scene is composed. I realize that the scene is only inches wide, but when looking at it ... even in such a close-up view ... the feeling of distance is remarkable. I think the different codes of rail really forces the perspective and pushes the branch line further back from the main ... and the painted backdrop has just the perfect amount of lack of sharpness so your eye perceives the softness as distance, when compared to the foreground ... and with the colours of the foreground blending so well with the backdrop, it creates a seamless and unspoiled landscape. The art of modeling railroading, has obviously found a home in your workshop. Well done.
ReplyDeleteRob, thank you, both for the kind words of praise and the observation.
DeleteConsidering your comments, I think they echo some of the thoughts in Chris and my ‘Small Layout Success’ series, but their impact in such a narrow scheme perhaps is demonstrated well with Bear Creek.