Friday Update: Bear Creek part two…
Seasons greetings and festive best wishes for tomorrow, Christmas is nearly upon us and I’ve enjoyed working on my new cameo project all week…

It would be misleading to say it had all gone well, there were some dark thoughts mid week about tearing it all up and throwing it away, but as things turned greener the balance was restored and I’m really happy with progress, more than that, I’m enjoying working on it, looking at it, creating something that to me is very different from my norm.


From the original scheme I had distilled…
The two things I want to practice are painting a back scene and working with the new techniques of track and ballast I completed recently…
Work began innocently enough with my usual blend of Humbrol enamels to paint the ties, in this case Humbrol 72 with a touch of 110 for the spur and 251 and 72 for the main. As a nod of solidarity with Chris, and a note to myself that things were going to be treated different as they would be toned down by washes, the rails were painted 62!
So learning point one, working with new ballast techniques… I had found the garden earth a little unpredictable and decided instead to add some Woodland Scenics fine ballast first, as a foundation for further work. This wasn’t an easy decision as I was worried I was copping out, failing at the first hurdle… however watching Chris use similar materials gave me some courage so I plumped for three shades, grey for the main, brown around the spur switch and cinders on the loop and spur… in hindsight the switch worked better than the loop and spur, I should have used more brown in the mix. This was droppered with the usual Woodland Scenics ‘scenic cement’ (which I’ve since learnt is dilute Matt medium)…
Using non-sanded tile grout, I began to fill in some of the holes in the ballast once this has dried for a few hours, this is a curios material as it darkens when wet, but dries the original colour - I must get a black or darker grey to use - more scenic cement was added. In the spirit of experimentation, whilst wet I also began to add a wash using Games Workshop nuln oil (a Matt black wash), which seemed to soak in to the ballast nicely… alas as the wash dried it seemed to gel the scenic cement and created a bit of a mess. I tinkered by adding some light grey ballast here and there, and more wash… it didn’t get any better. I am struggling to share in words how hard this moment was, I was heartbroken and frustrated, beaten, disheartened… I decided the best bet was to walk away and if I felt the same in the morning then it could just go in a bag in the loft until I was ready to deal with it…
In the morning it looked no better although a little of the sheen on the gloopy bits had subsided as the glue dried. I dry brushed some emulsion on it… that helped a tiny bit. Going back to my source material, the excellent Gary Durr book, I noted my rails were far to light so as a distraction I decided to paint them in a Humbrol 82 / 33 mix varied as I went and allowed to run down onto tie plates… things began to look more promojg, especially the main track… I carried on and used a blacker wash on the ties and ballast of the loop and slowly it began to come together. Not perfect, and more by fluke that judgment, but I was happy enough to leave it (above) to be later softened by greenery. I’ll leave it up to you as to if experiment 1 has been a success, for me, ‘more practice needed’…
The second learning point for Bear Creek was to try my hand at painting a backscene. I had pondered this whilst construction of the basic box was taking place. To paint a backscene it struck me that I needed to be done flat, off the layout. To that end, I determined that some mounting card I’ve been using for roads on Beaverbrook might work, and respond well to water colour. Painting in this medium is very comfortable for me, I have worked with water colours for 30+ years, as long as modelling actually, and I love painting landscapes, even ‘Bob Ross’ing it and making up scenes that just please me…
I cut the mounting board to fit, needing two end sections with wings to complete the full backdrop, joints are hidden by trees… placing these on the layout I sketched a rough mountain scene, the feature mountain is based upon a slide of Castle Mountain my dad took in 1989…
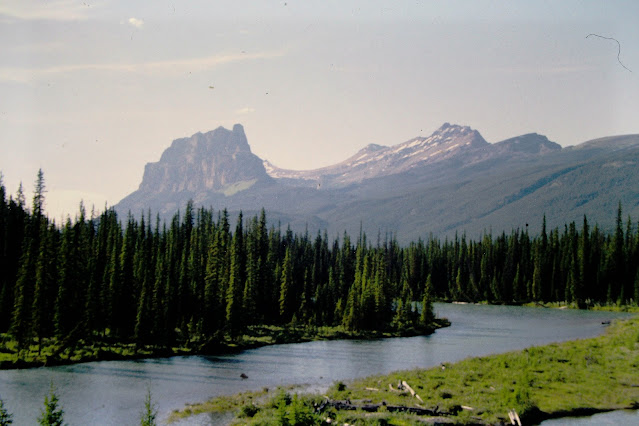 |
| Castle Mountain, Alberta, Canada, 1989. Photo Keith Hilton. |
I started as I do with smaller pieces, the sky. A wash of water 12” or so at a time, dip in some bright blue and wash and stipple it on to give the impression of a blue, crisp sky with a touch of haze. This needs careful control along the edge of the mountains as of course, it’s water colour, it’s difficult to layer these lighter shades. Once the sky was complete, edge to edge across all three pieces I could go back and start on the mountains. I roughed the outlines in, shading the mountains carefully before later going back and adding more detail and sub ridge lines, suggesting valleys in the distance. The secret is I think to use a slightly stronger colour at the edge, and let this fade naturally away. This seems to work well and in this instance lends a feeling of hazy cloud handing in some of the valleys… remember watercolour, light shades… keep it light. The final step was to add some trees along the foreground and inspired by my Dad’s efforts many years ago on the mountain back scene we painted together I began to work in some vertical colours and then turned these into tree shapes, filling in the gaps, adding edges to suggest layered trees, copying photos for shape and shade but relying on my creativity to fill the scene…
I shared a progress photo or two with Chris…
There’s something so alive in watercolour painting and I think it’s partly because of the way the paint records brush movements so the finished work is not a photograph as evidence of what we saw but a record of our movements as we practiced how to tell this story.
The beauty of water colour is of course the speed I which it dries, so after an hour I was able to fit it on the layout and take it all in…. Note the camera gets tricked by the cameo light box in a dark room and seems to over yellow the scene as well as showing it much brighter than it appears…
Of course, I couldn’t resist adding some trees to the scene, just balanced in place, which begin to show what I had in my mind when I started this project, a subtle subdued but bright backscene, dense foliage and well observed ground cover, very little man made, a logging railroad in the 1960s…
So heading into Christmas, I have a baseboard, track and ballast and backscene complete ready for ground work and textures, and one successful outcome and learning for another. I will enjoy working on this over the break, and am expecting a ‘Shay’ book to open on the day, amongst other things so I’m sure there will be distractions aplenty. One thing I hope this project has shown is the speed in which a cameo layout can come together, and perhaps in the early promise of the photos above, how these small layouts can become a 3D artwork around the home. Over the Christmas period I have penned a series of ‘Archive’ posts to keep you entertained, a break from the family or other distractions, I hope you enjoy them as much as I did writing them…
I will see you again for live updates in the new year. Until then, more soon…
Well this is already turning into some amazing work and outstanding artistry. I was actually liking the look of the rails painted with then Humbrol 62 ... there is something about that colour that just struck me as a great rusty look ... althou I knew it had to be toned down a tad. As for the ballast ... the finish mixture looks good to me ... mainly because I have walked so many abandoned railway tracks and know the composition of the ballast can drastically change in mere feet. The use of old cinders was primarily evident ... but there was also stone mixed into the blend ... always giving just as much variety at rusted rail colours. As for the backdrop ... it is marvelous the way it turned out ... and the way it blends so nicely into the foreground scene easily stretches the vista for endless miles ... the addition of the trees just ties it all together and transports the viewer to deep into a beautiful and rugged mountain scene. Kudos.
ReplyDeleteRob, your words are very kind and soothing for a battered mojo this week, the layout is maturing now and I’m happy but at times I’ve really struggled with it…
DeleteI’m going to take a few days away from it now, Christmas and then I know I’ve a CN GP38 under the tree that will need playing with on Beaverbrook…
This comment has been removed by the author.
DeleteEnjoyed this post immensely. Good to know I’m not alone when reading about some of your struggles. Trying something new each time you work on a build is what makes this hobby so enjoyable. The downside of course is that you are now working in the unknown and not always sure where you will end up . I established rules for these situations - one rule being to always build a quick test dry and/or wet (glued) before committing a technique to a model. There have been so many instances (in my excitement) when I glued something down and just hoped for the best only then ruin the work including days of set up. Unfortunately there is no control-z in our hobby!
ReplyDeleteNevertheless the work looks great so far. I’m especially interested in your backdrop and decision to hand paint it. Looks wonderful and is inspiring me to ‘have-a-go’ myself.
Thank you, I’m sure we all experience the learning process in different ways. As I have matured as a modeller I have found it easy to rely on the same well practiced skills to deliver results, for me these Christmas projects are a way to challenge myself to turn experiments into a layout.
DeleteJames, as I scrolled through your blog entries this morning I was captivated by your "Bear Creek" creation. I'm enjoying it on many levels. First, my wife is a very accomplished doll artist. She creates collectible art-dolls (http://bijoudollbyfrancebriere.com/), so I'm having fun sharing some of your postings with her to admire.
ReplyDeleteRegarding your comments about your father. My dad was a CN locomotive engineer for 35 years. I still have his retirement plaque and one day I was thinking how it would look even better with an HO model alongside. I started looking for an SW9/1200, which I think is what he was operating on THAT day (when I was about 12 years old) and I got to spend a day at work with him. I have so many fond memories from that.
This re-ignited my age-old interest in model railroads. Not so much 'trains going in circles' or 'generic scenery' but I think I'd like to try my hand at some story-telling settings or dioramas. I could see myself attempting something akin to your Bear Creek concept. Thanks again for taking the time to share your work with us. You have provided me with inspiration and a new challenge for something to aspire towards. Hey - even an old guy needs a goal in life! ;-) Cheers!, Grant.
Grant, thank you for stopping by, and for the kind comment. I’m really pleased you’ve been enjoying my blog, and in particular find insoriajrom in these smaller layouts. Can I recommend you click on ‘layout design’ and take a read of the three ‘small layout success’ blogs I co-authored with Chris Mears, also worth reflecting on my ‘marriage of space and prototype’ and ‘viewing height’ topics. That should fuel your creativity with some helpful principles. Let me know how you get on!
Delete