Bae Ceredigion: The river (N part 35)…
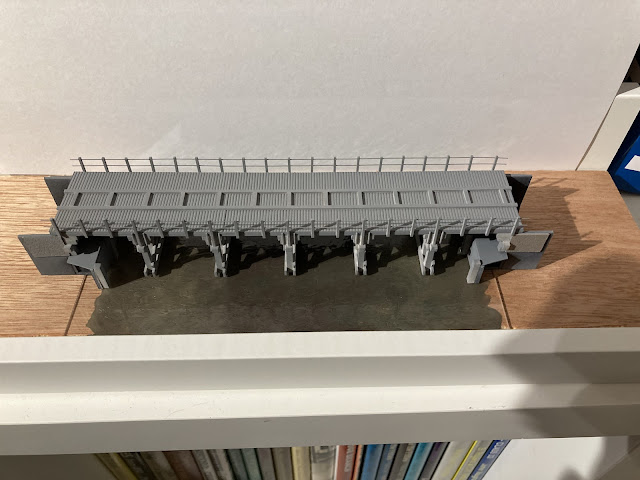
One of the key elements of this latest N scale cameo is the 'estuary' bridge and river scene. My Christmas projects are often about the opportunity to try out new ideas in a smaller footprint, and the biggest 'new' this year is the water...

The IKEA shelf isn't very deep and N scale is small. I've been lucky here to use an off cut from an A4 sized piece of 2mm thick clear material for the basis of the river. To me there were a few things I'd observed when I visited the prototype before Christmas, the colour of the water and the pattern of wind blown ripples on the surface, both I thought necessary to recreate on this model, as the perfect 'base' to the bridge.

The river is formed from a simple rectangle of the material and I used 3 Humbrol enamels (30, 72 and 98) to paint a muddy looking colour, slightly darker in the middle (because the edges will end up being blended with a muddy estuary river bank). I started with 98 down the centre, 72 down the edges and then used a few splodges of 30 and began to mix the muddy water colours together. The result was left to dry for an hour or so, before flipping it over and seeing how things looked.

The result was promising, but the reflection mirror perfect and so I turned to consider 'texture' for the water surface. I didn't need to represent a strong current, waves or anything here - just enough of a variation to disturb the perfect reflection and to add the feel of small wind induced ripples on the surface. If you study photos these are also never uniform, so the aim is for a pattern, but not consistently across the surface. If I was tackling a larger surface I might use a different approach but the smaller space meant I could work quickly and well within the drying time of a canopy glue - in this case Deluxe 'Glue 'n' Glaze'. This is a type of PVA that dries clear AND glossy, so perfect for this light rippling. I used a large brush to apply both smaller splodges and larger patches and then built up a pattern, with my artists hat on, an impression of the water surface I observed in photos - and reality.


The end result (as seen in the top image, and above) isn't bad at all. I think I could, if this was a more 'serious' piece add another layer in the same manner but for me this is 'good enough', providing an imperfect reflection at low angles, and looking suitably dingy from above, with just the sort of colours I observed at the real Ynyslas on a grey overcast day.
What next on this little project? Although I'm tempted to get some paint on over the primer on the bridge, more sensibly I need to paint the abutments at each side and bed these down, and then build up a framework for the embankments either side of the river and bridge to support the railway and scenic elements of this small but rather exciting little project.
All this enjoyment, along with a copy of the Wild Swan book on the Cambrian's coast lines is giving me too many ideas of a small exhibition layout... I really enjoy being out 'on the road' and I wonder if something along this vein may be of interest to the wider public and exhibition organisers over my existing collection of tightly cropped cameo / box layouts? Anyhow - I hope a few things, one, you've enjoyed catching up on progress, two you could use the approach yourself and three, that you realise and acknowledge that no matter your skillset or level of experience in the hobby there is always space for learning. It is the fuel for my creative fire, and I love it. Until next time, more soon...
Donate
I love writing and creating material for the blog. If you enjoy what you read and engage with I would be appreciative of any donation, large or small, to help me keep it advert and restriction free.
Comments
Post a Comment
Thank you for leaving a comment on my blog - I appreciate you taking the time to share your views. If you struggle to log in, please turn off the ‘block cross-site tracking’ setting in your browser.
James.